LaTeX Tailwind
Abstract
This almost class-less CSS library turns your HTML document into a website that looks like a LaTeX document.
Usage
To install this, run
npm install latex-tailwind
Then in your tailwind.config.js, add it as a plugin like this
module.exports = {
    //...
    plugins: [require("latex-tailwind")],
};
Then add latex-style to the outermost div you want to have LaTeX style
Options
There are two options for this plugin, footnotes and syntax, they can be enabled like so
module.exports = {
    //...
    theme: {
        latex: {
            footnotes: true,
            syntax: true,
        },
    },
    plugins: [require("latex-tailwind")],
};
Footnotes will only work with some markdown processors, only tested with remark and the remark-footnotes plugin. This will style the footnotes in a similar way to the rest of the document. It is optional as the footnotes class is external to the div it is created in, meaning that when enabled, it will apply for all footnotes classes in the document.
Syntax provides syntax highlighting in the style of minted, designed to work with prism.js.
Excluding components from the layers to purge is important as Tailwind doesn't see the classes created by Prism or the footnote generator
Inspiration
This has been inspired by Tailwind CSS Typography and LaTeX.css, with many of the styles being taken directly from the latter, and a few of the list styles being taken from the former.
Source
The source code of this project can be found at samrobbins85/latex-tailwind
Specific classes
theorem class:
The real numbers are uncountable
proof class:
If is countable, then is countable
lemma class:
An even number plus an even number is an even number
definition class:
A definition is a statement
Also, as a nice little extra, you can style the LaTeX logo by typing
<span class="latex">L<span>a</span>T<span>e</span>X</span>
General Markdown
The text below is taken directly from the tailwind Typography plugin, and works well to show how things work, along with ensuring that nothing looks weird.
What follows from here is just a bunch of absolute nonsense I've written to dogfood the plugin itself. It includes every sensible typographic element I could think of, like bold text, unordered lists, ordered lists, code blocks, block quotes, and even italics.
It's important to cover all of these use cases for a few reasons:
- We want everything to look good out of the box.
- Really just the first reason, that's the whole point of the plugin.
- Here's a third pretend reason though a list with three items looks more realistic than a list with two items.
Now we're going to try out another header style.
Typography should be easy
So that's a header for you — with any luck if we've done our job correctly that will look pretty reasonable.
Something a wise person once told me about typography is:
Typography is pretty important if you don't want your stuff to look like trash. Make it good then it won't be bad.
It's probably important that images look okay here by default as well:

Now I'm going to show you an example of an unordered list to make sure that looks good, too:
- So here is the first item in this list.
- In this example we're keeping the items short.
- Later, we'll use longer, more complex list items.
And that's the end of this section.

What if we stack headings?
We should make sure that looks good, too.
Sometimes you have headings directly underneath each other. In those cases you often have to undo the top margin on the second heading because it usually looks better for the headings to be closer together than a paragraph followed by a heading should be.
When a heading comes after a paragraph …
When a heading comes after a paragraph, we need a bit more space, like I already mentioned above. Now let's see what a more complex list would look like.
I often do this thing where list items have headings.
For some reason I think this looks cool which is unfortunate because it's pretty annoying to get the styles right.
I often have two or three paragraphs in these list items, too, so the hard part is getting the spacing between the paragraphs, list item heading, and separate list items to all make sense. Pretty tough honestly, you could make a strong argument that you just shouldn't write this way.
Since this is a list, I need at least two items.
I explained what I'm doing already in the previous list item, but a list wouldn't be a list if it only had one item, and we really want this to look realistic. That's why I've added this second list item so I actually have something to look at when writing the styles.
It's not a bad idea to add a third item either.
I think it probably would've been fine to just use two items but three is definitely not worse, and since I seem to be having no trouble making up arbitrary things to type, I might as well include it.
After this sort of list I usually have a closing statement or paragraph, because it kinda looks weird jumping right to a heading.
Code should look okay by default.
I think most people are going to use highlight.js or Prism or something if they want to style their code blocks but it wouldn't hurt to make them look okay out of the box, even with no syntax highlighting.
Here's what a default tailwind.config.js file looks like at the time of writing:
module.exports = {
    purge: [],
    theme: {
        extend: {},
    },
    variants: {},
    plugins: [],
};
Hopefully that looks good enough to you.
What about nested lists?
Nested lists basically always look bad which is why editors like Medium don't even let you do it, but I guess since some of you goofballs are going to do it we have to carry the burden of at least making it work.
- Nested lists are rarely a good idea.
- You might feel like you are being really "organized" or something but you are just creating a gross shape on the screen that is hard to read.
- Nested navigation in UIs is a bad idea too, keep things as flat as possible.
- Nesting tons of folders in your source code is also not helpful.
- Since we need to have more items, here's another one.
- I'm not sure if we'll bother styling more than two levels deep.
- Two is already too much, three is guaranteed to be a bad idea.
- If you nest four levels deep you belong in prison.
- Two items isn't really a list, three is good though.
- Again please don't nest lists if you want people to actually read your content.
- Nobody wants to look at this.
- I'm upset that we even have to bother styling this.
The most annoying thing about lists in Markdown is that <li> elements aren't given a child <p> tag unless there are multiple paragraphs in the list item. That means I have to worry about styling that annoying situation too.
For example, here's another nested list.
But this time with a second paragraph.
- These list items won't have
<p>tags - Because they are only one line each
- These list items won't have
But in this second top-level list item, they will.
This is especially annoying because of the spacing on this paragraph.
As you can see here, because I've added a second line, this list item now has a
<p>tag.This is the second line I'm talking about by the way.
Finally here's another list item so it's more like a list.
A closing list item, but with no nested list, because why not?
And finally a sentence to close off this section.
There are other elements we need to style
I almost forgot to mention links, like this link to the Tailwind CSS website. We almost made them blue but that's so yesterday, so we went with dark gray, feels edgier.
We even included table styles, check it out:
| Wrestler | Origin | Finisher |
|---|---|---|
| Bret "The Hitman" Hart | Calgary, AB | Sharpshooter |
| Stone Cold Steve Austin | Austin, TX | Stone Cold Stunner |
| Randy Savage | Sarasota, FL | Elbow Drop |
| Vader | Boulder, CO | Vader Bomb |
| Razor Ramon | Chuluota, FL | Razor's Edge |
We also need to make sure inline code looks good, like if I wanted to talk about <span> elements or tell you the good news about @tailwindcss/typography.
Sometimes I even use code in headings
Even though it's probably a bad idea, and historically I've had a hard time making it look good. This "wrap the code blocks in backticks" trick works pretty well though really.
Another thing I've done in the past is put a code tag inside of a link, like if I wanted to tell you about the tailwindcss/docs repository. I don't love that there is an underline below the backticks but it is absolutely not worth the madness it would require to avoid it.
We haven't used an h4 yet
But now we have. Please don't use h5 or h6 in your content, Medium only supports two heading levels for a reason, you animals. I honestly considered using a before pseudo-element to scream at you if you use an h5 or h6.
We don't style them at all out of the box because h4 elements are already so small that they are the same size as the body copy. What are we supposed to do with an h5, make it smaller than the body copy? No thanks.
We still need to think about stacked headings though.
Let's make sure we don't screw that up with h4 elements, either.
Phew, with any luck we have styled the headings above this text and they look pretty good.
Let's add a closing paragraph here so things end with a decently sized block of text. I can't explain why I want things to end that way but I have to assume it's because I think things will look weird or unbalanced if there is a heading too close to the end of the document.
What I've written here is probably long enough, but adding this final sentence can't hurt.
A longer example including footnotes for good measure
A description of the non-local means denoising algorithm
1 Non local means denoising uses samples from all around the image, instead of conventional denoising which will just look at the area around the given pixel to increase the accuracy of the colour. The reason it does this is due to the fact that patterns and shapes will be repeated in images, meaning that there will likely be an area somewhere else in the image that looks very similar to the patch around the pixel looking to be corrected. By finding these areas and taking averages of the pixels in similar areas, the noise will reduce as the random noise will converge around the true value.
So the method by which non-local means runs is to look at many patches throughout the image, and compare the similarities of those patches with the patch around the pixel looking to be denoised. This comparison then allows for assigning a weight to each patch looked at, which are then used (along with the colour of the pixel in the centre of the patch) in the calculation of the colour of the pixel to be denoised.
Various implementations of the algorithm and their efficiency
Pixelwise

2Taking an image u and a pixel in it you want to denoise, p, you first need to decide a patch size, given by r, as the dimensions of the patch (blue) are . You then look at all the other pixels, , but as it is intensive to do the calculations, specifying a research zone (red) allows you to make the processing faster as fewer comparisons have to be done. When looking at the other pixels, calculate their patch of the same size as the patch of p, then compare each pixel in the patch of q with the corresponding pixel in the patch of p. This similarity is then used to compute the similarity between the patch around p and the patch around q, and a weighting is given to q to describe this. These weightings are then averaged with the colours of the pixels to provide a more accurate representation of the pixel.
Patchwise
2 The main way in which patchwise differs from pixelwise is in the formulation of the weighting, as you can see below
By calculating weights for pixels instead of patches we can make one calculation per patch, therefore not needing to do calculations per pixel, providing a large increase in performance. The overall quality of the two methods are the same, and so the patchwise method is preferred as it has no drawbacks for an improvement in speed.
The strengths and limitations of non-local means compared to other denoising algorithms
Method noise
3Definition (method noise). Let u be a (not necessarily noisy) image and a denoising operator depending on h. Then we define the method noise of u as the image difference
This method noise should be as similar to white noise as possible. The image below is sourced from Buades, A., Coll, B., and Morel, J. 2005 3
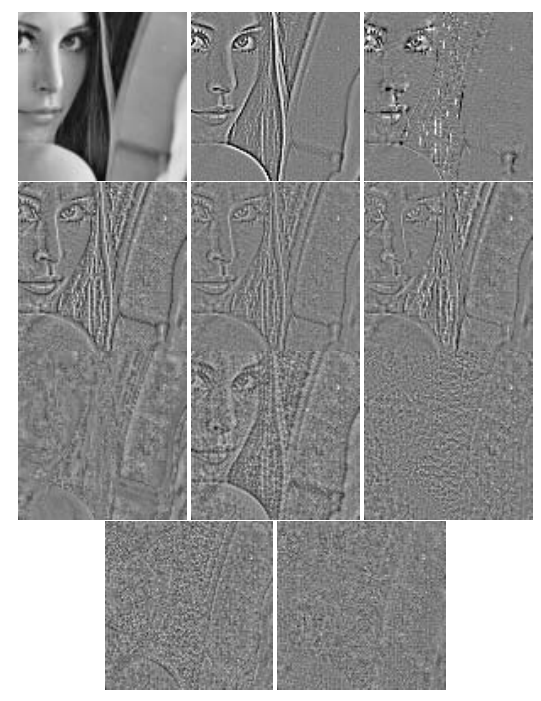
From left to right and from top to bottom: original image,Gaussian convolution, mean curvature motion, total variation, Tadmor–Nezzar–Vese iterated total variation, Osher et al. total variation, neighborhood filter, soft TIWT, hard TIWT, DCT empirical Wiener filter, and the NL-means algorithm.
You can see that the NL means algorithm is closest to white noise, as it is very difficult to make out the original image from the method noise, and so is the best in this area
Mean square error
4The mean square error measures the average squared difference between the estimated values and what is estimated. In images this acts as a measure of how far from the true image the denoised image is. These results are taken from Buades, A., Coll, B., and Morel, J. 2005 3
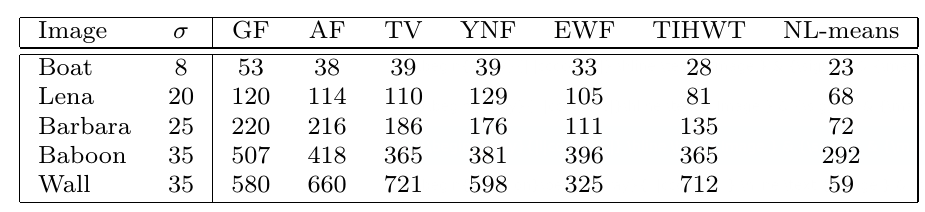
Here it can be seen that the NL-means algorithm gives images that are closest to the true image, and so performs best for image denoising under this measurement.
The influence of the algorithmic parameters on the output
In the following images I am changing the values of h, the template window size and the search window size, from a standard set at h=5, template window size=7 and search window size =21. I will adjust each one in turn to show the differences yielded by changing them.


By adjusting the value of h you get a large change in the amount of smoothing, although a large amount of noise is still present. Increasing the value of h does increase the PSNR from 28.60 to 29.66
The effects from adjusting the template width are much more subtle than that of adjusting h, it can be noticed in the wires overhead that a larger template width has reduced the detail. An increase in the template width yields a small reduction in the PSNR from 28.68 to 28.51.
The effects for the value of the search window are also very subtle, and again can only be noticed fully in the overhead wires. An increase in the search window yields a marginal increase in the PSNR from 28.51 to 28.52.
Modifications and extensions of the algorithm that have been proposed in the literature
Testing stationarity
3 One proposed modification is one to test stationarity. The original algorithm works under the conditional expectation process:
Theorem - Conditional Expectation Theorem
Let for be a strictly stationary and mixing process. For , let and be distributed as and . Let J be a compact subset such that
However this is not true everywhere, as each image may contain exceptional, non-repeated structures, these would be blurred out by the algorithm, so the algorithm should have a detection phase and special treatment of nonstationary points. In order to use this strategy a good estimate of the mean and variance at every pixel is needed, fortunately the non-local means algorithm converges to the conditional mean, and the variance can just be calculated using
Multiscale version
Another improvement to make is one to speed up the algorithm, this is proposed using a multiscale algorithm.
Zoom out the image by a factor of 2. This gives the new image
Apply the NL means algorithm to , so that with each pixel of , a list of windows centered in is associated
For each pixel of , with , we apply the NL means algorithm. However instead of comparing with all the windows in the search zone, we just compare with the 9 neighbouring windows of each pixel
This procedure can be applied in a pyramid fashion
Applications of the original algorithm and its extensions
Medical Imaging
5 It has been proposed that Non-Local means can be used in X-Ray imaging, allowing for a reduction of noise in the scans, making them easier to interpret. In CT scans a higher dose can be given to give a clearer image, but with that is more dangerous, however by applying the NL means algorithm a lower dose can be given for the same clarity. It benefits from the improvement stated above to test stationarity as the the noise and streak artifacts are non stationary. The original algorithm was also not good at removing the streak artifacts in low-flux CT images resulting from photon starvation. However by applying one-dimensional nonlinear diffusion in the stationary wavelet domain before applying the non-local means algorithm these could be reduced.
Video Denoising
6 NLM can also be applied in video denoising, it has an adaptation as the denoising can be improved by using the data from sequential frames. In the implementation proposed in the paper, the current input frame and prior output frame are used to form the current output frame. In the paper the measurements they make fail to show that this algorithm is an improvement from current algorithms, however the algorithm does have much better subjective visual performance.
- Buades, A., Coll, B., and Morel, J.M. 2005. A Non-Local Algorithm for Image Denoising. In 2005 IEEE Computer Society Conference on Computer Vision and Pattern Recognition (CVPR'05) (pp. 60–65). IEEE.↩
- Buades, A., Coll, B., and Morel, J.M. 2011. Non-Local Means Denoising. Image Processing On Line, 1.↩
- Buades, A., Coll, B., and Morel, J. 2005. A Review of Image Denoising Algorithms, with a New One. Multiscale Modeling & Simulation, 4(2), p.490–530.↩
- Machine learning: an introduction to mean squared error and regression lines. URL https://www.freecodecamp.org/news/machine-learning-mean-squared-error-regression-line-c7dde9a26b93/.↩
- Zhang, H., Zeng, D., Zhang, H., Wang, J., Liang, Z., and Ma, J. 2017. Applications of nonlocal means algorithm in low-dose X-ray CT image processing and reconstruction: A review. Medical Physics, 44(3), p.1168–1185.↩
- Ali, R., and Hardie, R. 2017. Recursive non-local means filter for video denoising. EURASIP Journal on Image and Video Processing, 2017(1), p.29.↩